
Introduktion: Hur man gör ett enkelt spel i Unity 3D
Unity 3D är en kraftfull spelmotor, enkel att använda och kanske viktigast av allt, helt gratis att ladda ner! (Det finns dock en ännu kraftfullare betalversion, men du kan göra så mycket med gratisversionen.)
Trots sitt namn så kan Unity 3D användas för både 2D- och 3D-spel. Du kan programmera i C#, Java eller Boo, ett språk som liknar Python. I den här handledningen så kommer jag att leda dig genom Unity-miljön och visa dig hur du gör ett enkelt spel i Unity 3D.
Du behöver ingen tidigare kodningserfarenhet för att följa de här instruktionerna; Det rekommenderas dock eftersom det kan underlätta för att korrekturläsa din kod för att hitta eventuella fel, om du har någon tidigare form av erfarenhet av något annat kodspråk.
Denna handledning är baserad på handledningen från Unity’s egen hemsida. Det finns ett stort antal gratis tutorials på deras egen hemsida. Jag skapade denna handledning mest för min egen träning med Unity 3D, men också för att komplettera videohandledningarna med en uppsättning skriftliga steg-för-steg instruktioner.
Steg 1: Skapa ett nytt projekt
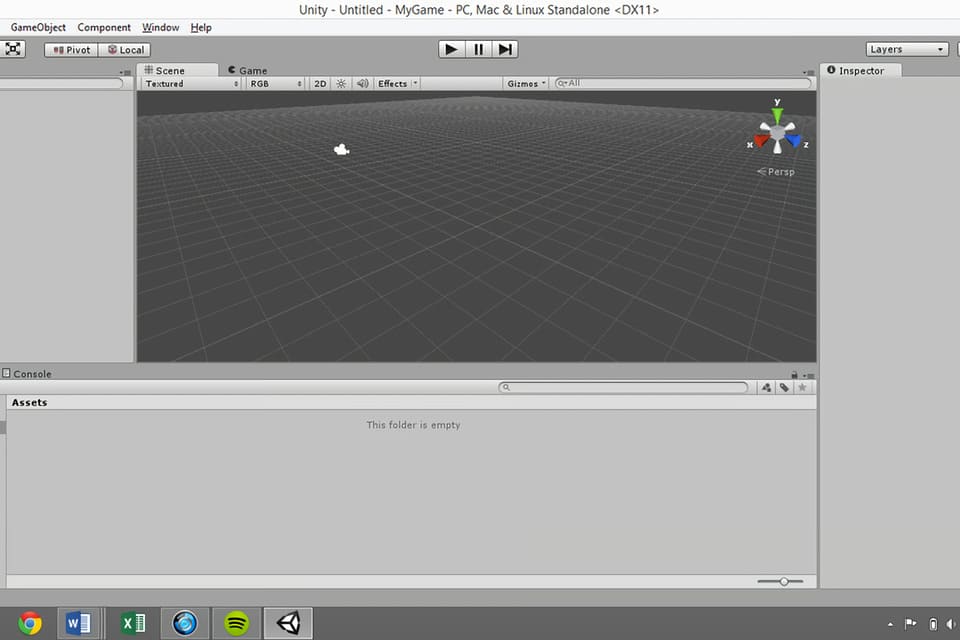
Öppna Unity3D.
Stäng fönstret ”Welcome to Unity” (Välkommen till Unity) som dyker upp som standard när du öppnar Unity 3D.
Klicka på ”File” (Arkiv) – ”New Project” (Nytt projekt).
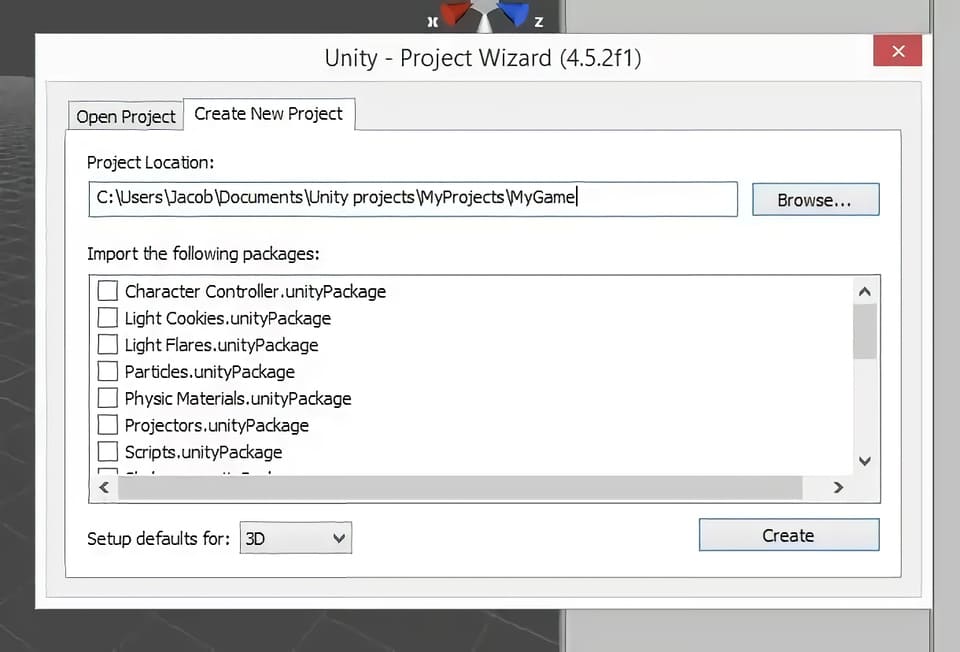
Välj platsen för att spara ditt projekt. Jag föredrar att använda en dedikerad mapp för alla mina Unity-projekt.
Skriv namnet på ditt projekt. På skärmdumpen så heter det nya projektet (My Game).
Se på skärmdumpen för hur detta ska se ut innan du klickar på knappen ”Create” (Skapa).
Klicka på ”Create” (Skapa)
Steg 2: Anpassa layouten
Det första du vill göra är förmodligen att anpassa layouten för ditt spel. Varje fönster kan klickas och dras på plats. Alternativt så kan du använda standardlayouterna som tillhandahålls med Unity 3D genom att klicka på listrutan under ”Layout” uppe till vänster på skärmen. Jag gillar ”Tall-layouten”, även om jag tycker att det är användbart att man kan placera spelvyn under scenvyn.
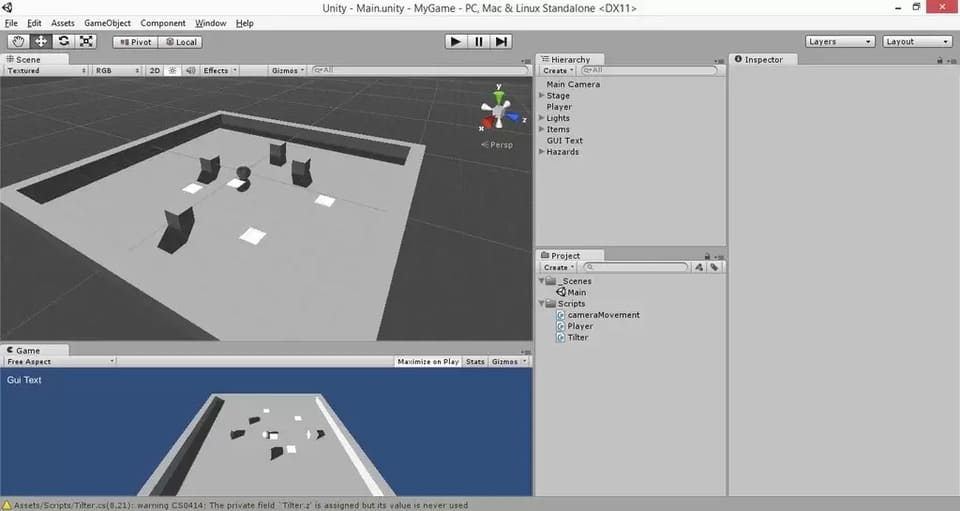
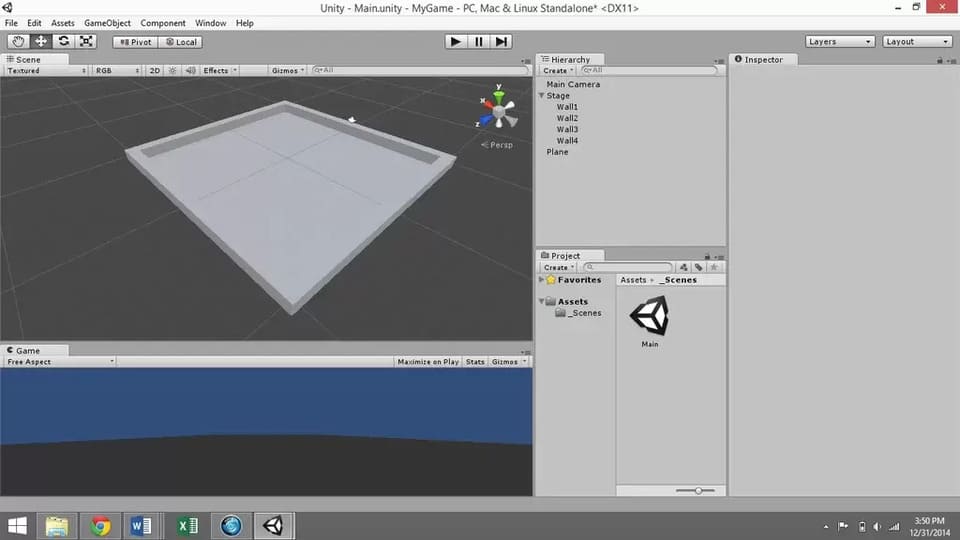
Det finns fem huvudfönster som du använder för det mesta med Unity 3D. De är fönstren ”Scene” (Scen), ”Game” (Spel), ”Hierarchy” (Hierarki), ”Project” (Projekt) och ”Inspector” (Inspektör).
Se de fem fönstren på bilden ovan.
Scene: det är här spelframställningen sker. Den visar vilka element du har i ditt spel och var de finns i förhållande till varandra. Det finns ett block i det övre högra hörnet som visar scenens rumsliga orientering.
Game: visar vyn som huvudkameran visar när spelet spelas. Du kan testa ditt spel i det här fönstret genom att klicka på knappen ”Play” (Spela) högst upp i mitten av skärmen.
Hierarchy: listar alla element som du har lagt till i scenen. Detta är huvudkameran som standard. Du kan skapa nya element genom att klicka på ”Create” (Skapa) och välja den typ av objekt du vill ha. Detta kan också göras genom att använda menyn ”GameObject” längst upp på skärmen.
Project: visar filerna som används för spelet. Du kan skapa mappar, skript etc. genom att klicka på ”Create” (Skapa) under projektfönstret.
Inspektör: det är här du anpassar aspekter av varje element som finns i scenen. Välj bara ett objekt i hierarkifönstret eller dubbelklicka på ett objekt i scenfönstret för att visa dess attribut i ”Inspector” panelen.
Steg 3: Spara scenen och ställ in strukturen
Klicka på ”File” (Arkiv) – ”Save Scene” (Spara scen). Spara scenen under mappen [Project Name] – ”Assets”. Assets är en färdig mapp där du kan lagra dina scener och skript. Du kanske vill skapa en mapp som heter ”Scener” i mappen Assets eftersom Assets-mappen kan bli ganska så rörig efter ett tag.
Spara scenen som ”Scene” eller ”Main” eller något liknande.
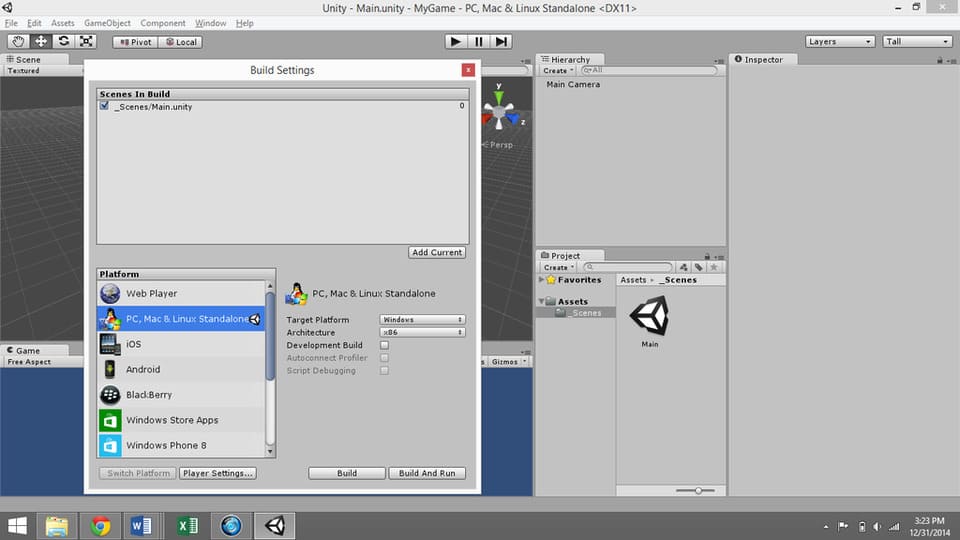
Klicka på ”File” (Arkiv) – ”Build Settings” (Strukturinställningar).
Lägg till aktuell scen att skapa.
Välj önskad plattform. Det finns många olika alternativ, inklusive datorer, spelsystem och smart phones, men om du skapar ett projekt för första gången så kommer du förmodligen att vilja välja ”Web Player” eller ”PC/Mac/Linux Standalone”.
Klicka på ”Player Settings” längst ned i fönstret ”Build Settings window”. Detta öppnar alternativen för ”Player Settings” i ”Inspector”. Här kan du ändra företagsnamn, produktnamn (spel), standardikon osv.
Stäng ”Build Settings window”. Du kommer tillbaka till detta igen när du är redo att färdigställa ditt spel.
Steg 4: Skapa scenen
Det enklaste sättet att skapa en scen i Unity3D är att lägga till kuber.
För att göra detta, så gå till ”Game Object” – ”Create Other” – ”Cube”, eller använd menyn ”Create” i hierarkifönstret. Lägg till en kub.
Återställ kubens transformation genom att högerklicka på ”Transform” i ”Inspector” panelen. Det är bra att alltid göra detta när du skapar ett nytt spelobjekt.
Välj kuben i hierarkin. Byt namn på den till ”Wall” genom att dubbelklicka på dess namn i ”Hierarchy” eller använda ”Inspector” panelen.
Skala kuben i X-riktningen för att göra den lång och väggliknande.
Högerklicka på ”Wall” i ”Hierarchy” panelen och duplicera den tre gånger, så att du har fyra väggar. Det kommer dock då att se ut som att du bara har en vägg eftersom de är identiska och därför upptar samma punkt i rymden. Dra dem på plats och/eller använd transformationsalternativen för varje kub för att göra ett arrangemang som ser ut som en arena.
Observera: För att se dig omkring i scenvyn, så klicka på musknappen i mitten (mushjulet) för att panorera och rulla upp och ner för att zooma in och ut. Klicka och dra samtidigt som du håller ned ALT-tangenten för att rotera vyn.
Skapa ett tomt spelobjekt med hjälp av rullgardinsmenyn ”Game Object” för spelobjekt (Create Empty) längst upp på skärmen. Kalla det ”Stage”. Återställ dess transformation.
Välj alla fyra väggar ”Walls” och dra dem under ”Stage” (Game Object).
Lägg till ett ”Game Object” (spelobjekt) plan genom att välja ”Create” (Skapa) i ”Hierarchy” (hierarkipanelen) och använd det för golvet. Byt namn på det till ”Floor” och dra det under ”Stage” i hierarkin.
Observera: du måste trycka på enter efter att ha bytt namn, annars så kanske ändringen inte träder i kraft.
Ge golvet en transformation på -0,5 i Y-riktningen för att säkerställa att det blir snyggt och linje med de fyra väggarna.
Ändra golvets skala i X-, Y- och Z-riktningarna till 1/10 av skalan du använde för att dimensionera väggarna.
Steg 5: Skapa spelkaraktären
Du kan ladda ner karaktärer från olika platser online, som ”Unity Store”, men för den här handledningen så kommer vi bara att använda ett av de inbyggda spelobjekten för spelkaraktären.
Gå till ”Game Objects” – ”Create Other” – ”Sphere”.
Välj ”Sphere” i hierarkin och döp om den till ”Player”. Återställ dess transformation.
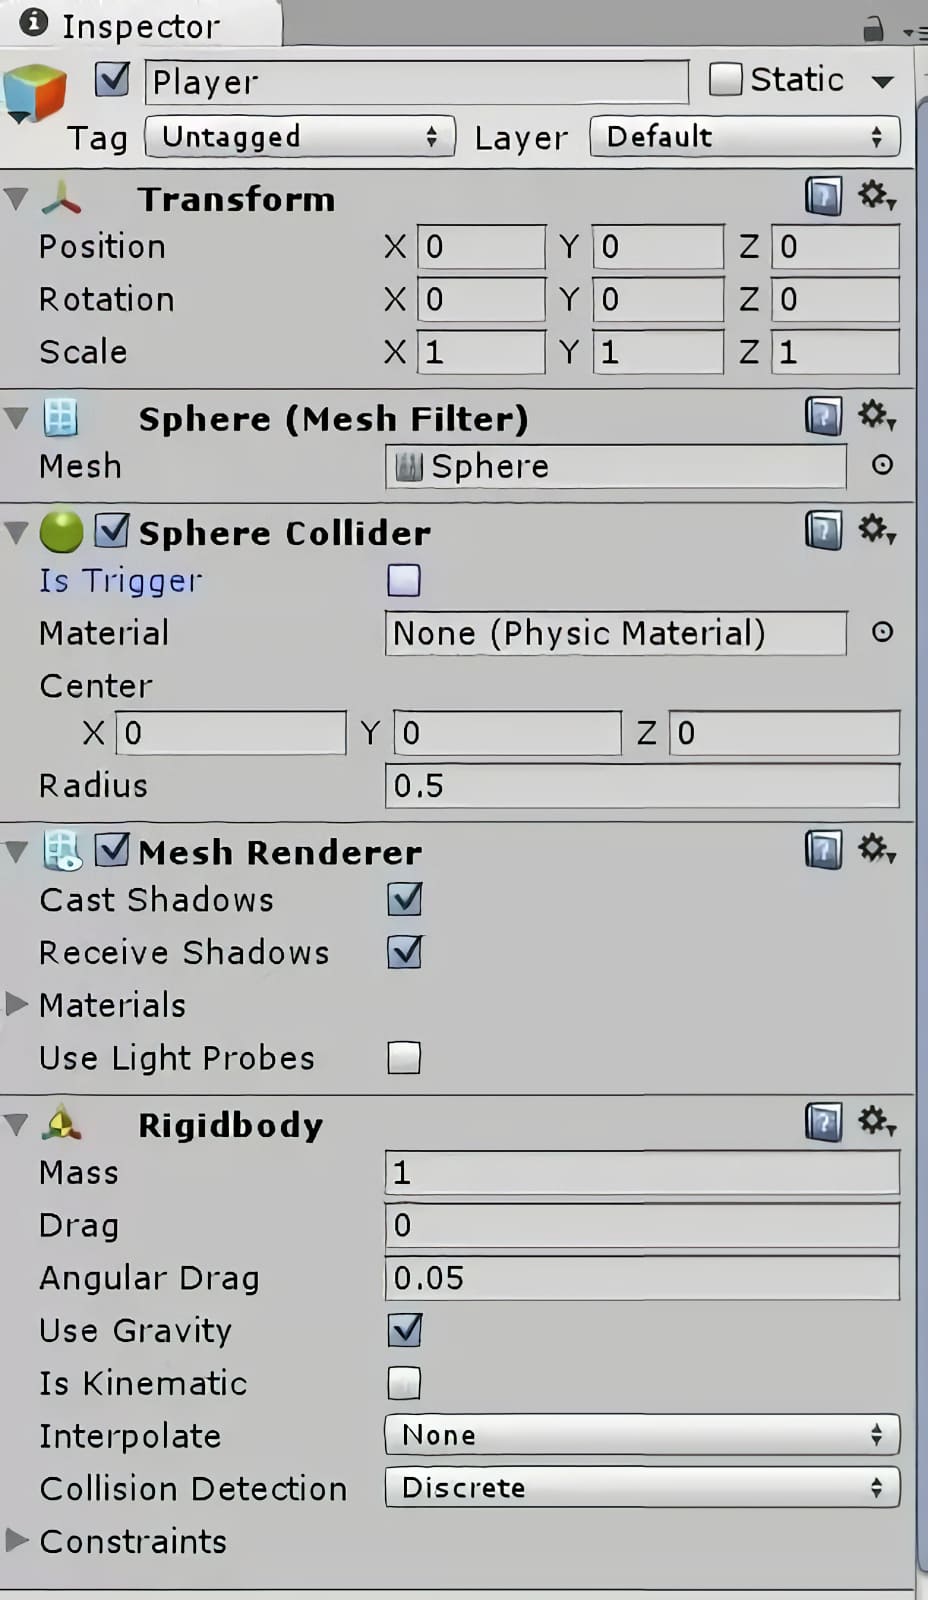
Nu behöver vi använda oss av lite fysik. Göra spelkaraktären föremål för fysikens lagar genom att klicka på ”Add Component” längst ned på ”Inspector” panelen med spelkaraktären vald. Lägg till ”Physics” – ”Rigidbody”. Lämna alla standardinställningar som de är.
Du kommer att märka att varje objekt kommer med en mängd olika ”components” (komponenter) som du kan se i ”Inspector” panelen. Varje kub, sfär, etc. har en komponent som kallas en ”collider”. Detta är det fysiska området på skärmen där objektet anses ta upp plats. Om du stänger av en ”collider” så blir föremålet som ett spöke som kan passera genom andra föremål.
(Se video för vad som händer när du stänger av spelarens ”collider” komponent.) Du kan slå på och stänga av komponenter ”collider” genom att markera och avmarkera rutan bredvid komponentens namn.
Steg 6: Få spelkaraktären att röra sig
Välj spelkaraktären i hierarkin.
Minimera komponenter som du inte vill se öppna i ”Inspector” panelen genom att klicka på nedåtpilarna till vänster om namnet på varje komponent. Detta kommer att rensa upp din arbetsyta en hel del.
Klicka på ”Add Component” (lägg till komponent) längst ned i ”Inspector” panelen. Välj ett ”New Script” (nytt skript), namnge skriptet något i stil med ”PlayerController” och välj ett programmeringsspråk. Jag använder i regel själv ”CSharp”. Klicka på ”Create” och ”Add” för att lägga till komponenten.
För att hålla ordning på filerna, så öppna mappen ”Assets” i projektfönstret och skapa en mapp som heter ”Scripts”. Lägg sen ditt nya skript i den här mappen.
För att öppna skriptet för redigering, så dubbelklicka på skriptets namn i ”Inspector” panelen eller öppna det från ”Project window” (projektfönstret). Detta öppnar en programmeringsmiljö som kallas ”MonoDevelop”.
Observera: Om det här är första gången du kodar så bör du veta att det kan vara riktigt pedantiskt. Så se till att du verkligen är helt konsekvent med stavning, kasus och att ha öppnande och avslutande parenteser, hakparenteser, klammerparenteser, citattecken, etc. Se också upp för fel som beror på att du inte har ett semikolon i slutet av en kodrad.
Det bör redan finnas två sektioner inkluderade i din kod som standard: void Start () och void Update (). Start körs så fort objektet kommer in i spelet, och uppdateringen körs kontinuerligt medan objektet är i spelet. Vi kommer att lägga till en tredje, kallad ”FixedUpdate” för att hantera fysikrelaterade protokoll.
Den koden ska se ut så här:
void FixedUpdate () {

}
Innan vi kan mata in kommandon så måste vi deklarera variabler. Detta görs längst upp på sidan, inom de krulliga parenteserna efter ”Public Class PlayerController” (eller liknande): ”Monobehaviour”, men före den ”void Start()”-funktionen. För rörelse så kommer vi att använda en variabel som kallas ”speed” (hastighet), som vi kan justera för att bestämma hastigheten med vilken vår karaktär rör sig runt på arenan.
Deklarera variabeltypen (float) och namnet (speed) så här:
public float speed;
Semikolonet talar om för programmet att detta är slutet på kodraden. Du kommer att få ett felmeddelande om du glömmer att inkludera ett semikolon i slutet av varje/de flesta rad(er) med kod, så utelämna det inte!
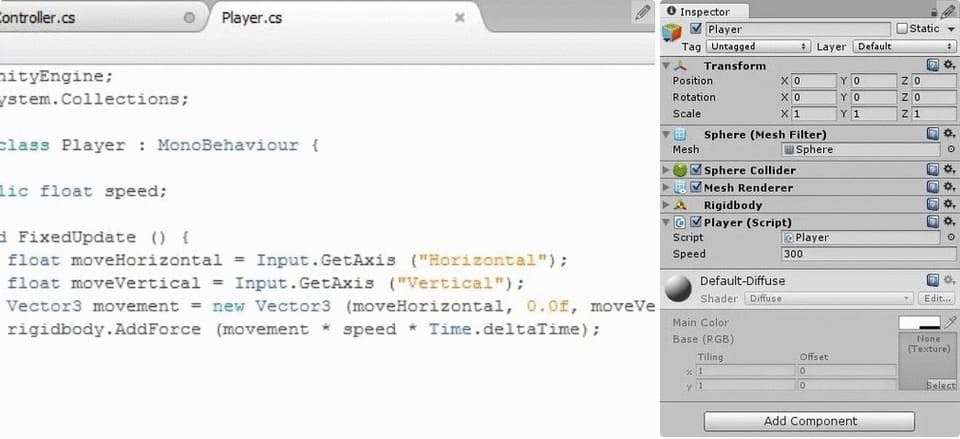
Under ”FixedUpdate”, så deklarerar vi ytterligare två ”floats”, ”moveHorizontal” och ”moveVertical”. Dessa antar värden beroende på användarens tangentbordskommandon, och ”FixedUpdate” uppdaterar dem för varje bildruta.
float moveHorizontal = Input.GetAxis(“Horizontal”);
float moveVertical = Input.GetAxis(“Vertical”);
Rörelser är viktiga.
Fortfarande inom ”FixedUpdate”, så skapar vi en ny ”Vector3”, en typ av variabel med tre dimensioner användbar för att flytta runt objekt i 3D-rymden. Detta kommer att anta värdet av användarens input för horisontell och vertikal rörelse, och kommer att vara noll i upp/ned-riktningen eftersom spelaren i det här spelet bara kan röra sig i två dimensioner.
Vector3 movement = new Vector3(moveHorizontal,0.0f,moveVertical);
Till sist, så matar vi in en ”force” (rörelse) på spelkaraktären för att flytta runt den med ”rigidbody.AddForce”, ett protokoll som är inbyggt i spelkaraktärens ”rigidbody”-komponent.
rigidbody.AddForce(movement*speed*Time.deltaTime);
”Time.deltaTime” används för att göra rörelserna smidigare. Vi kommer att justera hastighetsvariabeln senare, i ”Unity”-redigeraren.
Spara CSharp-filen och växla tillbaka till Unity 3D.
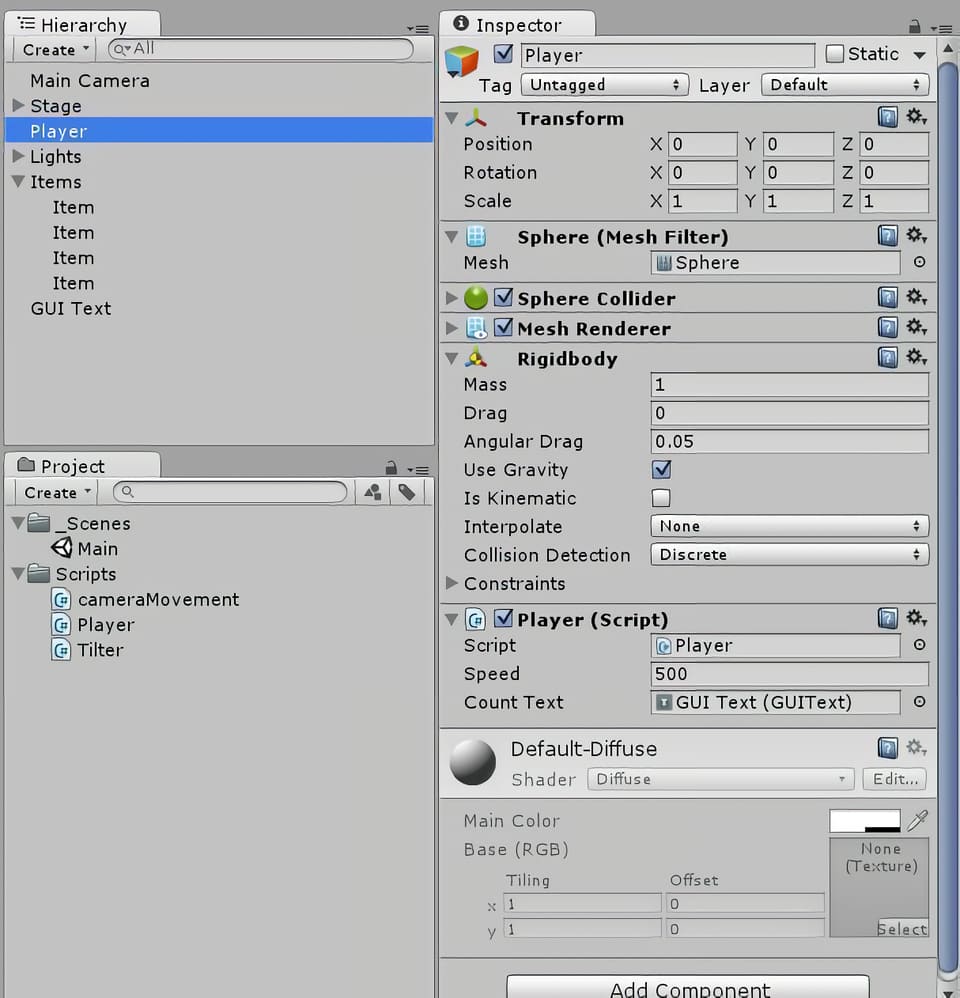
Gå till ”Inspector” panelen för spelaren och titta på rörelseskriptet du just har skapat. Det borde finnas en ruta för din ”public variable”, hastighet. Du kan ändra värdet på ”public variables” i ”Inspector” panelen.
Så här långt, så anger vi hastigheten lika med ett tal mellan 100-1000 och klickar sen på uppspelningsknappen högst upp i mitten av skärmen. Du bör kunna flytta runt bollen med Unitys förinställda rörelsetangenter, antingen ASWD eller piltangenterna.
Klicka på uppspelningsknappen igen för att lämna testläget.
Steg 7: Lägg till belysning
Skapa ett tomt ”Game Object” (spelobjekt) och kalla det ”Lights”. Gör detta genom att klicka på ”GameObject” i det övre verktygsfältet och välja ”Create empty” (skapa tomt).
Skapa ett riktat ljus genom att välja alternativet från verktygsfältet ”Create” (Skapa) i ”Hierarchy”-panelen. Döp det till ”Main Light”. Gör det till ett underordnat objekt av ”Lights” genom att dra det i hierarkin till spelobjektet ”Lights”. Detta är ett liknande koncept som att lägga till en fil i en mapp.
Med ”Main Light” (huvudljus) valt, så ändra ljusinställningarna i ”Inspector” panelen genom att ändra ”Shadow Type” (skuggtyp) till ”Soft Shadows” (mjuka skuggor) och ”Resolution” (upplösning) till ”Very High Resolution” (mycket hög upplösning).
I ”Inspector”-panelen så ändrar du huvudljusets rotation för att vinkla det ned över arenan. Jag använde 30X, 60Y, 0Z.
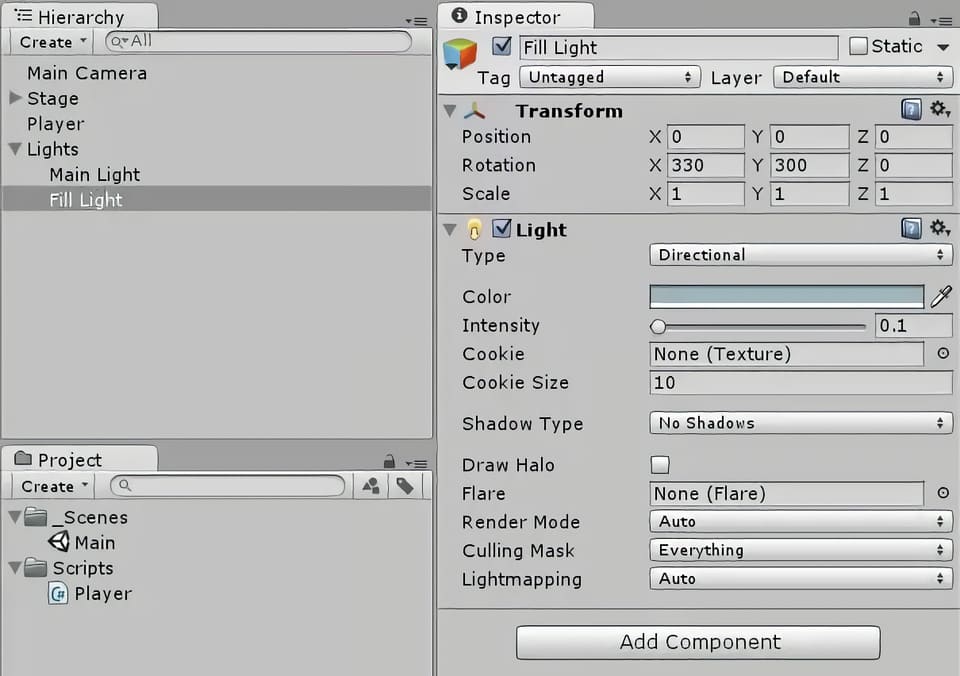
Högerklicka på ”Main Light” (huvudljuset) i ”Hierarchy”-panelen för att duplicera det. Namnge dubbletten ”Fill Light” och underordna den under ”Lights”.
Dämpa intensiteten på ”Fill Light” genom att ändra färgen till en lite ljusblå nyans och minska fältet ”Intensity” till 0,1 (i Inspector).
Ändra ”Shadows” (Skuggor) till ”No Shadows” (Inga skuggor).
Vinkla ”Fill Light” i motsatt riktning mot huvudljuset. I mitt fall så satte jag det till (330, 300, 0).
Steg 8: Finjustera kameravinkeln
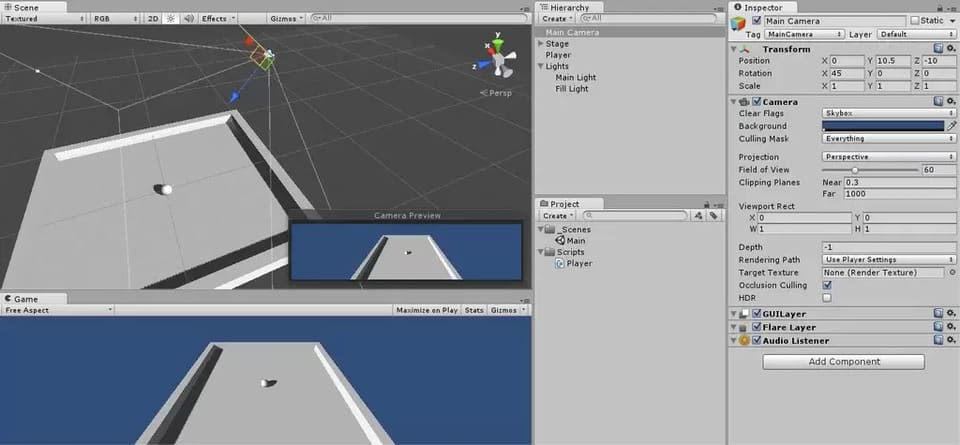
Vi vill att kameran ska vara vinklad ned över arenan, så välj ”Main Camera” (huvudkameran) i hierarkin och justera dess transformation tills bilden i kameraförhandsvisningen (längst ner till höger på scenpanelen, med kameran vald) ser bra ut.
Jag använde själv (0, 10,5, -10) för position och (45, 0, 0) för rotation.
Du kan också dra runt kameran i scenvyn för att placera den där du vill ha den, om du så önskar.
Steg 9: Få kameran att följa spelkaraktären
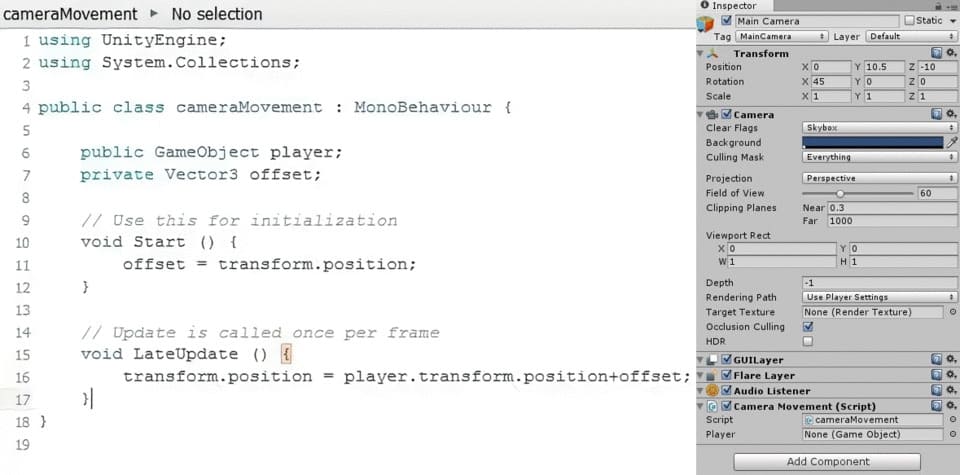
Vi vill att kameran ska följa spelaren runt på skärmen när den rör sig. För detta ändamål, så skapar vi ett skript som heter ”cameraMovement” genom att lägga till en ny skriptkomponent till huvudkameran i panelen ”Inspector”. Dubbelklicka på skriptet för att öppna det i ”MonoDevelop”.
Detta skript kommer åt ett annat ”Game Object” (spelobjekt), spelkaraktären, så du måste deklarera detta innan skriptets ”Start()”-funktion genom att skriva:
public GameObject player;
Skapa sen en ”Vector3” med namnet ”offset” genom att skriva:
private Vector3 offset;
Tilldela värdet för ”offset” under ”Start()”-funktionen,
offset=transform.position;
vilket är kamerans position (x,y,z).
Under en funktion som heter ”LateUpdate ()”, så definiera kamerans position som spelarens position plus en viss ”offset”:
void LateUpdate () {
transform.position=player.transform.position+offset;}
Spara skriptet och gå tillbaka till Unity 3D.
Vi måste tilldela ett ”Game Object” (spelobjekt) till ”spelkaraktären” vi definierade i ”cameraMovement”-skriptet. Välj huvudkameran och titta på panelen ”Inspector”. Under ”cameraMovement”-skriptet så bör det finnas en ruta som heter ”Player”. Det är för närvarande tilldelat till ”None” (GameObject). Dra spelkaraktären från hierarkin till den här rutan för att tilldela spelkaraktärens spelobjekt till ”cameraMovement”-skriptet.
Var noga med att dra det nya skriptet till skriptmappen i ”Project panel” (projektpanelen), som du skapade under ”Assets” (tillgångar).
Testa spelet genom att klicka på play-knappen högst upp i mitten av skärmen. Du ska nu kunna flytta runt spelaren med piltangenterna och kameran ska då följa dina rörelser.
Spara scenen och spara projektet.
Steg 10: Skapa föremål
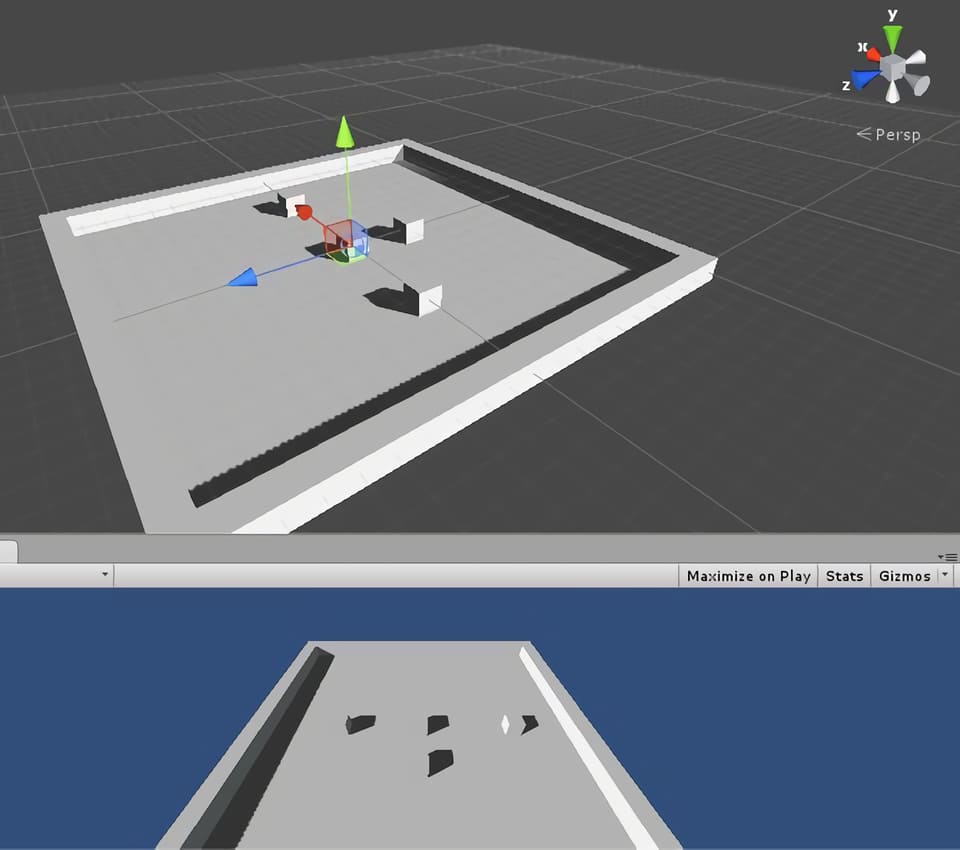
Skapa ett nytt ”Game Object” (spelobjekt). Det kan vara en sfär, en kub, en kapsel eller en cylinder. Jag använde en kub.
Kalla det ”Item” (objekt).
Tagga objektet som ”Item” genom att välja ”Tags” (taggar) och skapa en ny tagg som heter ”item”, gå sedan tillbaka till ”Tags” för det spelobjektet och välj den nya ”item”-taggen som du skapade. Tagga alla dina ”items” (föremål) som ”items” (föremål). Se till att du också alltid matchar stavningen samt versaler och gemener exakt som du anget det.
Placera din ”Item” (föremål) i ett tomt ”Game Object” (spelobjekt) som heter ”Items” (objekt).
Återställ dess transformationer.
Lägg till en ”rigidbody” till objektet.
Duplicera föremålet ett antal gånger och placera sedan kopiorna runt arenan.
Steg 11: Få spelaren att samla in föremålen och visa poängen

Öppna spelarens rörelseskript från ”Inspector”-panelen med spelkaraktären markerad och ändra skriptet så att spelaren kan samla in och hålla reda på föremålen som den har samlat in.
Gör två deklarationer: en är en variabel som håller reda på din poäng, och den andra är en GUI-text som visar dina poäng i scenvyn.
private int count;
public GUIText countText;
Under funktionen ”void Start()”, initialisera ”count” och ”CountText”, en funktion vi kommer att skriva senare.
count=0;
CountText();
Skriv en ny funktion för vad som händer när spelaren kolliderar med objekten. Detta bör vara en egen sektion, precis som sektionerna ”void Start()” och ”void Update”.
void OnTriggerEnter(Collider other){
if (other.gameObject.tag == “item”)

{other.gameObject.SetActive(false);

count=count+1;

CountText();}

}
Skriv ”CountText”-funktionen, som uppdaterar poängen på GUI-displayen.
Void CountText(){
countText.text="Count: " + count.ToString();

}
Spara koden och byt tillbaka till Unity 3D.
Välj alla dina föremål, se till att de är taggade som ”items” (föremål) och markera knappen ”Is Trigger” i ”Box Collider”-komponenten i ”Inspector”.
Kontrollera även knappen ”Is Kinematic” under ”rigidbody”. Detta förhindrar dina föremål från att falla genom golvet, huvudsakligen genom att stänga av gravitationen.
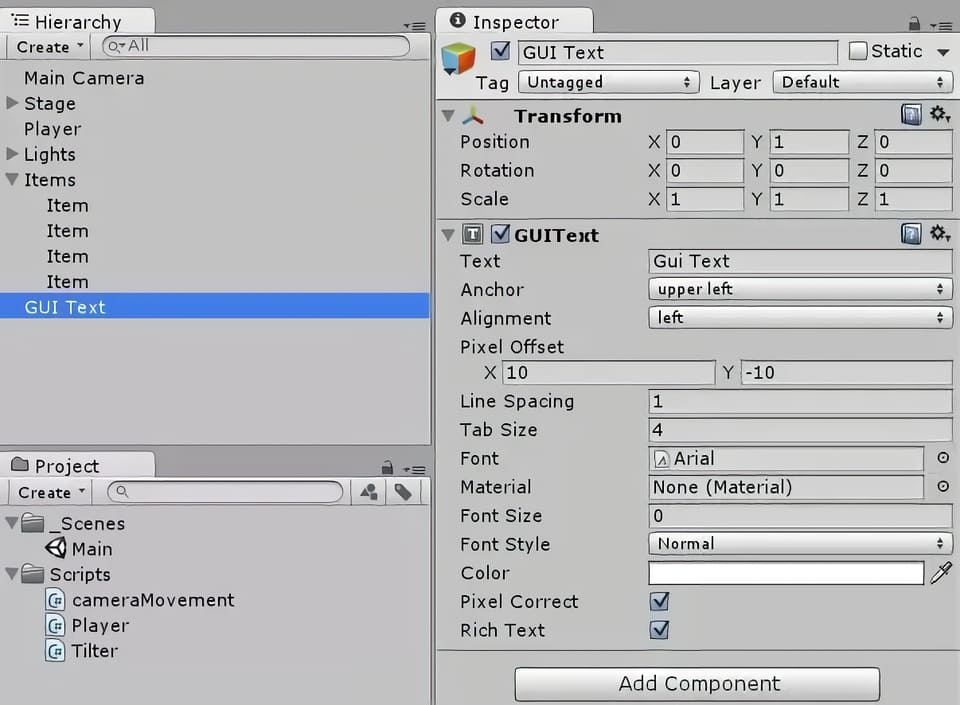
För ”countText”, skapa ett nytt ”GUI (grafiskt användargränssnitt) Text” med hjälp av alternativet ”Create” (skapa) under ”Hierarchy”.
Ställ in ”GUI Text” transformationen till (0,1,0) och ge den en pixelförskjutning på (10, -10) i ”GUIText”-komponenten i ”Inspector”-panelen.
Dra ”GUI Text” till rutan ”Count Text” i ”Inspector”-panelen med spelkaraktären vald.
Steg 12: Skapa faror
Dessa svårsedda paneler kommer att skjuta upp spelaren i luften, och möjligen utöver kanten av arenan, i vilket fall som helst så kommer då spelet att vara över. Att skapa faror är en liknande process som att tillverka föremål.
Skapa ett nytt tomt spelobjekt som heter ”Hazards”.
Skapa en ny ”Quad” och kalla den ”Hazard”.
”Tagga” det som en ”Hazard” (fara) och markera ”Is Trigger” (är utlösande).

Ändra dess färg så att du kan se den genom att välja ”Mesh Renderer” i ”Inspector”, med faran vald, och ändra dess material. Klicka på rullgardinsmenyn vid ”Materials” (material) och använd den lilla grå cirkeln till höger om rutan för att välja ett annat material än det grå standardmaterialet för faran. Jag hade redan ett vitt material förinstallerat, så jag använde det.
Ändra farans rotation till 90 runt X-axeln och sänk dess Y-höjd till -0,4 så att det är en liten vit fyrkant som ligger precis över golvet på arenan.
Redigera ”Player”-skriptet under ”OnTriggerEnter()”-funktionen så att det tar hänsyn till möjligheten att objektet som spelaren stöter på är en fara och inte ett objekt. Säg åt spelkaraktären att hoppa om den träffar på faran med hjälp av nedanstående kodrader.
void OnTriggerEnter(Collider other){
if(other.gameObject.tag=="item"){
other.gameObject.SetActive(false);
count = count + 1;
CountText();
}
if(other.gameObject.tag=="hazard"){
other.gameObject.SetActive(false);
Vector3 jump = new Vector3(0.0f, 30, 0.0f);
rigidbody.AddForce (jump * speed * Time.deltaTime);
}
Spara koden, gå tillbaka till ”Unity”-redigeraren och duplicera faran några gånger.
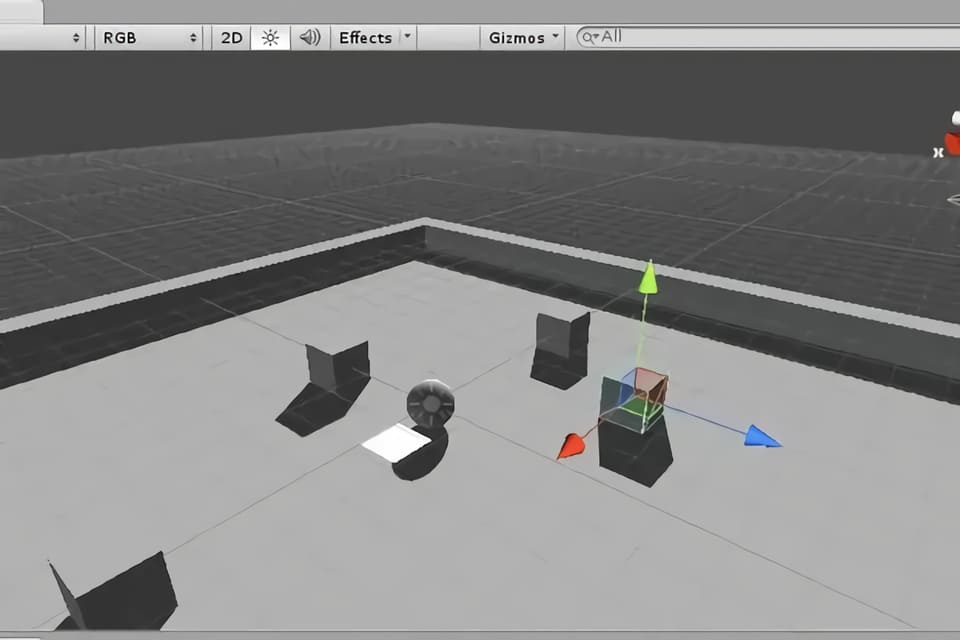
Placera farorna lite slumpvist runt arenan och testa sedan det färdiga spelet!
Spelutveckling
Vad är spelprogrammering och hur man blir spelprogrammerare
Om du vill bli spelprogrammerare så är det här ett bra ställe att börja på! Lär dig om programmerarens roll och ansvar, löneförväntningar och tips för att komma in på jobb som handlar om spelprogrammering.
Du kommer att få förstahandsinsikter från vår mentor inom spelprogrammering.
Vad är spelprogrammering?
Spelprogrammering syftar på koden som väcker ett video- eller datorspel till liv.
I takt med att tekniken har utvecklats så har programmeringen också utvecklats. Tidigt i videospelshistorien så var programmerare ofta ansvariga för de flesta aspekter av utvecklingen av spel, inklusive design. Men allt eftersom hårdvara och mjukvara förbättrats och spelen blivit allt mer komplexa, så har utvecklarteamen växt dramatiskt.
Spacewar, 1962, det första utbredda och spridda videospelet. Spacewar var det första spelet som kördes på Computer History Museum’s PDP-1.
Spelarnas förväntningar har också växt och mer tid läggs nu på saker som en avancerad grafik och artificiell intelligens för att förbättra användarupplevelsen.
Nya jobb har skapats och de är ofta mer specialiserade, särskilt i större spelstudior som Ubisoft, Blizzard Entertainment och Electronic Arts.
Vad gör en spelprogrammerare?
I huvudsak så skriver en spelprogrammerare koden som väcker ett videospel till liv. De har dock alltid ett nära samarbete med producenter och andra avdelningar (till exempel avseende speldesign, animation och ljud, etc) för att översätta projektets vision till ett fullt fungerande, spelbart spel.
De kan vara ansvariga för allt från att bestämma hastigheten med vilken din karaktär springer och hur högt de hoppar, till hur många fiender som dyker upp och när, och hur de reagerar när de blir attackerade.
Vår mentor, som har varit i branschen i ett decennium, säger:
”En stor missuppfattning om spelprogrammerare är att de inte har så mycket att säga till om när det gäller designen eller inriktningen av ett spel. Men det är inte sant.”
”Som den som implementerar kärnfunktionerna så vet du gränserna för motorn och tekniken som används, och du måste kunna kommunicera och samarbeta med alla andra i teamet som jobbar med att utveckla spelet. Du är inte längre helt i din egen värld och bara programmerar 8 timmar om dagen .”
Det är viktigt att notera att det finns många olika typer av programmerare (som vi tar upp längre ner), så beroende på storleken på studion och projektets komplexitet så kan en programmerare vara högt specialiserad inom ett område (t.ex. en ljudprogrammerare som fokuserar på att koppla ihop vissa ljud med handlingar eller händelser, eller en AI-programmerare som dikterar hur en icke-levande-karaktär i spelet kommer att reagera på ditt nästa drag).
I en mindre studio så kan dock rollen kräva att personen gör lite mer av varje.
Förutom starka matematik- och datorkunskaper säger vår mentor:
Problemlösningsförmåga är ett absolut krav! Kommunikationsförmåga är också avgörande eftersom det måste finnas ett nära samarbete till exempel med design och ljud för att få ut det mesta av tekniken och implementera lösningar som möter framtida behov av spelet.
Typiska arbetsuppgifter kan inkludera:
- Att översätta projektets vision till kod för att skapa ett spelbart spel.
- Bygga en anpassad basmotor för spelet.
- Skriptfunktioner, händelser, interaktioner.
- Skapa fysik (t.ex. gravitationsskillnader i ett spel som utspelar sig i rymden).
- Utveckla och modifiera 3D-grafikrenderingar.
- Simulering av artificiell intelligens hos motståndare.
- Lägga till ljudeffekter, musik och röster.
- Implementera spellogik och mekanik.
- Skapa användargränssnittet.
- Skriva kod som är specifik för tangentbord, möss eller joysticks.
- Gör det möjligt för spelare att tävla eller samarbeta via LAN eller över internet.
- Utveckla anpassade verktyg.
- Anpassning av kod mellan olika plattformar.
- Implementera algoritmer, ta itu med minneskrav och cacheproblem.
- Identifiera och åtgärda buggar.
Arbetskraven kan variera, men på en grundläggande nivå kan det inkludera:
- Gedigna kunskaper i ett eller flera programmeringsspråk (C++, Java, etc).
- Erfarenhet av motorer (Unreal Engine, Unity, etc).
- Utmärkta kommunikationskunskaper.
- Stark matematik, problemlösning och analytisk förmåga.
Programmerare hjälper till att skapa en sömlös användarupplevelse genom att visa viktig information på skärmen på rätt plats vid rätt tidpunkt.
Jobbmöjligheter
Idag är branschen stark och fortsätter att växa med uppskattningsvis 2,5 miljarder spelare världen över. Marknadsundersökningsföretaget Newzoo uppskattar att globala marknadsintäkter förväntas uppgå till 196 miljarder dollar 2022. Så om du vill komma in i branschen så är det en bra tid att göra det nu! Det går att studera på universitet eller privat och utbildningen kan finansieras med studielån eller ett kreditkonto om det gäller en mindre summa tillfälligt.
Programmerare är avgörande för att göra videospel, så jobbutsikterna är goda. Men det är en konkurrensutsatt bransch så det är viktigt att hålla sig á jour med trender och känna till de senaste verktygen och teknikerna.
Vår mentor, som är ansvarig för att intervjua jobbkandidater i sin nuvarande studio, tillägger att:
Att vara programmerare är ett utmanande jobb, särskilt inom spelutveckling där visionerna och förväntningarna är höga och ditt tidsschema ofta är pressat.
Om du precis har tagit examen från en spelprogrammeringskurs, så kommer du troligtvis att leta efter jobb som en underordnad programmerare för att få en fot innanför dörren.
Andra typer av spelprogrammerarjobb inkluderar:
- Användargränssnitt (UI) Programmerare.
- AI programmerare.
- Grafik programmerare.
- Ljudprogrammerare.
- Motor programmerare.
- Verktygsingenjör.
- Nätverksingenjör.
- Teknisk ledare
Även om de flesta programmeringsjobb normalt utförs på plats i en studio (och du kan behöva överväga att flytta om din stad har begränsade möjligheter för den här typen av jobb), så kanske du kan hitta en distans- eller frilanstjänst.
Gör en lista över spelstudiorna i ditt område, eller studior du gärna vill arbeta på, och övervaka deras lediga-jobb-sida. Titta igenom jobbannonser inom området för att se vilka färdigheter du redan har och vad du behöver lära dig mer om.
Spelutveckling
Hur videospel tillverkas: spelutvecklingsprocessen!
Tänk på att ett team med 5-10 anställda på en indiestudio arbetar väldigt annorlunda mot ett team på 1000+ personer som på Ubisoft eller EA. Så tänk efter vilken typ av miljö du sannolikt kommer att utmärka dig i, men i båda fallen så kommer din förmåga att anpassa dig snabbt och att du kan arbeta under press hjälpa dig att lyckas.
De flesta programmeringsjobb utförs på plats, men vissa studior kan anställa distansarbetare eller frilansare.
Bästa spelprogramvaran
Det finns en mängd olika program att välja mellan, men om du vill göra spel professionellt, så sikta på att lära dig branschstandardiserade spelprogrammeringsspråk och den programvara som stora studior använder, som C++, Java, Unreal Engine och Unity 3D. Detta kan minska din inlärningskurva och öka dina chanser att bli anställd.
Här är 5 gratis programmeringsverktyg för att komma igång:
- Unreal Engine 4
- Unity 3D
- GameMaker Studio 2
- Konstruera 3
- Godot motor
Utveckling av casinospel
Spelbranschen förändras hela tiden och allt fler nya innovationer lanseras löpande. Detta märks framförallt inom genren som live casino där du hittar otaliga spelshower, omgjorda bordsspel och intressanta titlar med inbyggda specialfunktioner. Det finns tusentals olika casinospel gratis och lanseras nya varje månad. Jobbmöjligheterna är stora och en fördel är att många spelutvecklare är svenska med kontor i Sverige men även i andra länder runtom i världen.
Den allra största kategorin av spel kallas för slots eller spelautomater, men här hittar vi också flest utvecklare. Tidigare var poker väldigt populärt och även bingo men på senare år ha spelautomater tagit över och det är bara en fördel då det finns mycket mer jobb för utvecklare inom detta område. För att syssla med spelutveckling krävs det att företagen är snabba på att programmera, skapar en tilltalande design, men bidrar även med intressanta teman som spelarna vill ta del av.
I denna artikel ska vi djupdyka bland de olika programvarorna som driver spelen, men också vilka titlar som är mest populära just nu. Du får även reda på hur du kan studera till spelutvecklare, hur branschen sticker ut, samt vilka som är de ledande namnen inom speltillverkning. Även inom casinon i övrigt finns det stora jobbmöjligheter för programmerare och tack vare utvecklingen tillkommer hela tiden nya tjänster som casino med mobilt bankid vilket ställer nya krav.
Spelmotorer och kategorier
Det finns några vanligt förekommande spelmotorer som används inom slots. För att ge dig en tydligare överblick har vi punktat ned de bästa av dem här nedan. Alla nya funktioner utöver vanliga bonusfunktioner och freespins kräver ny utveckling.
- Megaways: Denna spelmotor utvecklades av Big Time Gaming och inkluderar expanderande ytor, multiplikatorer som växer, samt kaskadvinster som kan ge dig fler utbetalningar på ett enda snurr.
- Cluster Pays: Många titlar drivs med Cluster Pays där utbetalningarna delas ut med hjälp av vinstgivande ”kluster” där intilliggande symboler matchas. Det första spelet som inkluderade denna spelmotor var Aloha! Cluster Pays från NetEnt.
- Megaclusters: En annan variant av Megaways som innehåller större symbolblock som kan splittras till mindre sådana.
- xWays: Denna funktionalitet är utvecklad och framtagen av tillverkaren Nolimit City. En symbolplats kan bereda rum för flera symboler samtidigt, bland annat för att öka antalet vinstvägar.
- Traditionella hjul: I denna kategori ingår klassiska upplägg som 5 hjul, 3 rader och 10 vinstlinjer. Några spel som använder varianter av denna är exempelvis Starburst och Gonzo´s Quest.
Spelstudior
Vilka speltillverkare finns det då på marknaden just nu? I nedanstående lista presenterar vi de mest kända av dem, men också vad som får dem att sticka ut:
- Big Time Gaming: Tillverkaren påbörjade sin resa i Australien, men har nu blivit en av de största namnen inom kategorin slots. Några nämnvärda titlar som de har lanserat inkluderar Bonanza, Wild Flower och Survivor Megaways.
- Relax Gaming: Om du har hört talas om spel som Money Train, Temple Tumble eller Snake Arena så är det Relax Gaming som står bakom succén. De rankas för tillfället som en av de allra främsta namnen inom branschen, framförallt på grund av släpp som Top Dawgs, Book Of 99 och Hellcatraz.
- Nolimit City: En annan utvecklare som haft otroligt mycket vind i seglen är Nolimit City. De senaste åren har de lanserat otaliga toppspel som Deadwood, San Quentin xWays och East Coast vs West Coast. Tillverkaren utmärker sig genom att skapa teman som är kontroversiella, men även med enorma maxvinster och hög potential.
- NetEnt: NetEnt har skapat många av de tidlösa klassikerna som hittas på nätcasino idag, bland annat Starbust och Gonzo´s Quest. På senare tid har de släppt många brandade slots som Knight Rider och Street Fighter 2, men även uppföljare som Starburst XXXtreme.
- Play’n GO: Denna spelstudio är framförallt känd för alla ”Of Dead” spelen som Book Of Dead, Secret Of Dead, Doom Of Dead samt Amulet Of Dead. De har också lanserat klassiker som Reactoonz, Raging Rex, samt Fire Joker.
- Evolution: Evolution påbörjade sin resa inom live casino, men på senare år har de köpt upp flera stora namn som Red Tiger, NetEnt och Big Time Gaming. För tillfället anses de vara världens största speltillverkare, framförallt på grund av alla uppköp.
Utöver programmerare till spel så behövs det många utvecklare inom andra områden som plattformar för casino och betting odds m.m. Även många av dessa bolag har kontor i Sverige så jobbmöjligheterna är bra.
Utbildningar för att bli spelprogrammerare
Det finns otaliga karriärsteg du kan ta för att arbeta med spel. Till att börja med kan du studera spelutveckling som ett masterprogram, men du hittar också ämnen som kreativ teknik, Virtual Reality-utvecklare, Game Artist och Unreal Engine Creator.
Om du vill jobba med casino har du många möjligheter att ingå i ett team av designers eller programmerare inom branschen, särskilt då framtidsmöjligheterna är goda. Vi förutspår nämligen att casinobranschen kommer att växa enormt under de närmsta åren, specifikt inom segmentet slots och live casino.
Spelprogrammerares löneförväntningar
Den genomsnittliga programmeraren tjänar 42 400 kr i månaden, men lönen kan variera mellan 34 000 – 58 000 kronor i månaden. En topprogrammerare kan dock tjäna betydligt mer än så. (Aktuella siffror för 2022)
Lönerna beror på erfarenhet, läge, studiostorlek och det kan variera kraftigt över eller under dessa medelvärden. Ledande / senior programmerare och tekniska direktörer kan ligga långt över toppen inom det här intervallet med sina år av erfarenhet och kunskap.
Var man kan studera spelprogrammering
Behöver du ett diplom eller examen för att bli spelprogrammerare? Det korta svaret är nej. Men du behöver en viss erfarenhet eller kompetens och en fantastisk portfölj för att få ett jobb. Branschen är mycket konkurrensutsatt, så en kurs kan hjälpa dig att få den kompetens du behöver och sticka ut i mängden.
Även om det är möjligt att bli självlärd och få ett jobb, så måste du vara extremt disciplinerad och veta var du ska leta efter de senaste verktygen och teknikerna som används av toppstudios. Vissa självlärda programmerare har ägnat flera år åt att arbeta med spel på egen hand och har en stark portfölj att visa upp efter det.
Programmeringsböcker och handledningar är ett bra ställe för ett pågående lärande, men om du vill få upp dina färdigheter till en professionell standard, så sök efter formella spelprogrammeringskurser.
När du jämför kurser, så se till att de undervisas av branschfolk som har arbetat med AAA-spel i stora studior. Någon som aktivt arbetar i branschen kommer att ha fingret på pulsen och kunna lära dig de senaste teknikerna och professionella arbetsflöden. De kommer att veta vad arbetsgivare letar efter och hjälpa dig att få dessa färdigheter.
Du vill vara säker på att tiden och pengarna du investerar i din utbildning resulterar i att du tar examen med självförtroende för att komma igång på ditt första jobb.
Vanligtvis så kommer ett flerårigt examensprogram att täcka lite av allt och du kan behöva ta kurser i ytterligare ämnen. Medan mer specialiserade kurser i spelprogrammering, erbjuder en mer robust karriärfokuserad läroplan som lär ut de jobbfärdigheter som studiorna kräver när de anställer.
För dem med en bakgrund inom datavetenskap, mjukvaruteknik, matematik eller fysik kan en programmeringskurs vara ett effektivt sätt att utöka sin anställningspotential och få in en fot i branschen.
3 tips för att få ett jobb som spelprogrammerare
Du måste ha något att visa när du söker jobb för spelprogrammering. Lägg tid på att arbeta med projekt och bygga upp din portfölj. Visa upp dina bästa arbeten och visa upp dina kodningsfärdigheter.
Din portfölj är ditt pass till branschen.
Förutom att ha en utmärkt portfölj och CV, så kommer här 3 tips som hjälper dig att sticka ut:
- Förtroende
”Du kommer att få genomgå massor av tester och intervjuer. För att komma förbi dessa så måste du vara säker på dig själv och din kompetens. Sättet att få det självförtroendet är att öva, arbeta med projekt och pressa dig själv för att få komma ur din komfortzon. Utöka din kunskap.” - Efterforskning
”Det finns gott om konferenser, föredrag, utvecklarbloggar och platsannonser där ute. Lär dig vad proffsen pratar om, ta reda på vad företag letar efter när det gäller spelprogrammering. Bekanta dig med termerna och de senaste trenderna i branschen.” - Nätverk
”Gå med i ett forum, delta i möten och få ditt namn känt där ute.”